Wednesday, October 26, 2011

Vietnamese Flan Recipe (Banh Flan)


For those who are not familiar with Vietnamese flan and wondering what the heck it is or what's the difference between it and some other types out there...I'll try to explain as best I know how. Although I call it "Vietnamese Flan", the idea is actually French based. As far as difference in taste, this flan recipe is not as "rich" as some other flan recipes that are creamier and really sweet. This flan lands closer to a Chinese "egg tart" consistency than custard like.

Flan has always been one of my favorite desserts and I've tried making it numerous times. By tweaking amounts of ingredients, I've come to find my personal favorite recipe for Vietnamese flan that is simple and simply delicious.


Vietnamese Flan Recipe (makes roughly 6-7 ramekins, depending on size)

  • 4 eggs
  • 6 egg yolks
  • 1 can of sweetened condensed milk
  • Milk
  • Hot water for recipe and for baking bath
  • 1 tspn Vanilla powder
       For Caramel:
  • 1/4 cup of sugar
  • 2 tbsp of water
Directions:

1. Preheat oven to 350 degrees.
2. Break all 4 eggs and 6 egg yolks into medium bowl. Whisk together just to combine, no need to "whip" the eggs.
3. In a separate bowl, add whole can of condensed milk. Using the empty can as your measuring tool, fill the whole can with hot water and add it to the condensed milk. Mix together to dissolve the condensed milk. Again, using the empty can, fill the whole can with milk and add to the condensed milk. Mix to combine.
4. Add the eggs to the condensed milk and mix to combine. Over another bowl, run this mixture through a strainer in order to get a smooth combination. Add vanilla powder and mix together.
5. To make the caramel, place the sugar and water in a small saucepan over medium heat. Heat and stir until the mixture turns a light golden brown. The caramel will continue to cook and grow darker in color even after removing from the heat. 
6. With your ramekins placed inside a baking pan with high walls, divide the caramel into the bottoms of each ramekins. You don't need to make it perfect because it will all evenly melt during baking.
7. Pour the flan mixture into the ramekins, making sure to fill to near the top.
8. Take some hot water and pour it into the baking pan so that the water reaches about half way up the sides of the ramekins.
9. Place baking pan in oven in center rack and bake for 50 mins. 

To keep my flans longer, I cover them with plastic wrap and place them in the refrigerator. When ready to serve, run a knife around the sides of the ramekins and invert the flan onto a plate. 


Hope you enjoy!

Pin It Now!

Tuesday, October 25, 2011

DIY : Wedding Bouquet


So here's another simple DIY that I did for my brother's wedding recently. The main flowers that I used were tulips with some deep orange mini cala lilies scattered in there. After this, I don't know if I would actually recommend using tulips in your bouquets because although they are my favorite and so pretty to look at, the red red tulips bloomed so large by the next day. So maybe if you're considering using tulips, choose ones that are still tightly closed which will slowly open for you. 

To make this bouquet, I removed all the leaves of my tulips and kept the long stems in tact. I simple picked up about 3 tulips and decided that would be my center. I added a few fillers such as baby's breath, queen ann's lace and some yellow/red flowers I found at the wholesale flower store. 


For every two "main" flowers you bring into the bouquet, add 2-3 small pieces of filler flowers as well. Really, this is the whole concept of creating these bouquets. Rotate the bouquet so that you can see where things need more of something or not. Also, keep in mind that it should be rounded off, so don't have all the lengths of the flowers even, make it more dome like in the center and work your way out.


When you're happy with the size of the bouquet, use some rubber bands to hold it in place. Wrap the band around and try to have it closer to the top as you can so that the flowers don't droop over. For these bouquets, I decided to add some green stems to the outside to give it some "green". Again, I wrapped a rubber band around the bouquet and used it as a fastener for the green stems. I had help in looping the stems and adding it to the bouquet...trust me, it was much faster this way. 


At this point, you're ready for the ribbon. I used a half inch brown ribbon and some head pins to secure. Begin close to the base of the flowers and pun in your ribbon with a downward motion to the pin. You don't want to just stick the pin straight into the handle of the bouquet it case someone might hold it to tightly, so point the pin downward when pinning.


(I decided to add the green stems after already adding ribbon the bouquet, so that's why the above picture is missing the green stems)

Continue wrapping the ribbon around and pinning at about 3/4" intervals. When you reach a point you want to stop at, cut the ribbon and this time, pin in an upward direction, as to not have the sharp pins showing out the bottom. From here, just cut off the end stems to your desired length, and you're good to go. 


Sorry that I don't have a "final product" picture to show you guys but I was finishing up the ribbon part of these bouquets on the morning of the wedding, I was kind of a wreck trying to remember things and it slipped my mind.

As this will the be the last Wedding DIY I have you, I'm gonna just have a little show and tell with some photos from the wedding. I'll show you better ones when we get pictures back from the wedding photographer.


My brother and his bride.


The wedding party at the reception


Me and my nieces.


Me and my bf near the end of the night. As you can tell, my shoes are off. My feet were killing me for having to run around in them.....what us girls won't do for a great pair of shoes. : )


And last...the wedding cake. A simple sponge cake with chocolate mousse.

I hope you guys enjoy this photo overload post.


Pin It Now!

Thursday, October 20, 2011

DIY Wedding Favors - Chocolate Truffles

Hey guys! These last few days have really been "catch on sleep" days because this past weekend was my brother's wedding and I pretty much planned the whole thing. The few days leading up to the big day was so stressful for me....and it's not even my wedding day. With favors to make and flowers to arrange, at least I have some DIY things to show all of you. 


The Bride wanted to have chocolate truffles as the favor, so I tried to comply.


Chocolate Truffles

(recipe from www.thefauxmartha.com)
makes about 15
  • 1 1/2 c. 60% bittersweet chocolate pistoles
  • 1 c. heavy cream
  • Toppings: chopped nuts, cocoa powder, chocolate sprinkles

1. In a 2-quart, heavy-bottomed saucepan, bring the cream to a light simmer over medium heat.
2. Meanwhile, measure the chocolate and place it in a heat resistant bowl.
3. Once the cream reaches a light simmer, pour it over the chocolate. Wait about 10 seconds for the cream to work its way into all of the crevices of chocolate, then whisk to combine.
4. Let the ganche cool for 10 minutes before placing in the refrigerator until chilled, about 2 hours.
5. Meanwhile, chop toppings for truffles.
6. Using a mini ice cream scoop, scoop ganache and roll into ball with hands. Time to get messy.
7. Coat truffle in topping and place in mini cupcake liner


These paper boxes were picked up from Michaels, but I think you could save more money if you ordered from wholesalers around the internet. I used a bit of shredded crinkly paper from the dollar store for the bottom of the boxes, just to give it something extra.

The outside decorations are just simple printed card stock that I used craft punches to create. I gave it dimension by using the 3D foam sticker dots. The ribbon and the circular punch were attached by just a glue gun. 

This is such a simple wedding favor and it didn't take that long at all. 

During the wedding reception, one of these favor boxes was placed at each seat. One box at each table was marked with a heart and we decided to gift the live orchid center pieces to the person who happened to have the favor box containing the heart. 


All in all, the wedding went great but I'm so glad it's over!! Don't know what I'd be like when the day comes for my own wedding....probably a hot mess.


Pin It Now!

Wednesday, October 12, 2011

Thrifty Jewelry Finds

I am running out of space on my board for necklaces and other jewelry but I can't help myself when I see the sparkly pieces. I swear, it's like moth to a flame. Sad, but hey, at least I'll have pretty things to show you!


This necklace has 3 chains of varying lengths to it and the medallion like pendant. I thought that the pendant was so interesting because it looks like an old man's pocket watch but also had the woman carving, which reminds me of British monarchy for some reason. I don't know if I'll take some of the chains off because I think it might be too much to have this pendant and all the chains in one piece, but we'll see. (Goodwill - $3.99)


I love the red and gold of this necklace because it really stands out. It reminds me of Greek mythology or something to that effect. The detailing on it is awesome and in such great condition. (Goodwill - $.99) ...yeah, can you believe that it was a dollar? crazy.


This gold choker makes me think of 70's cocktail party. No? I don't know what it is that makes me think so, maybe the design? Who really knows but I can't wait to incorporated into some future outfits! (Deseret Industries - $5.00)


Yes, so this one is a bit different than the previous because it's not a choker!. It's a long think chain with these great bead detailing. It's great because it's actually really simple as a whole but the intricate beads really make it interesting to look at. (Goodwill - $3.99)


Lastly, it's this little bracelet. When I saw it, all I could about was the black and gold choker I found earlier and posted about. I couldn't resist. I did have to remove one of the links and add a jump ring to it because the original was missing the link that gets attached to the clasp. Hey, a little fixing isn't hard at all. (Goodwill - $1.99)

Sorry that this post is so "picture heavy" but I hope you guys enjoyed nonetheless!


Pin It Now!

Sunday, October 9, 2011

There She Goes...


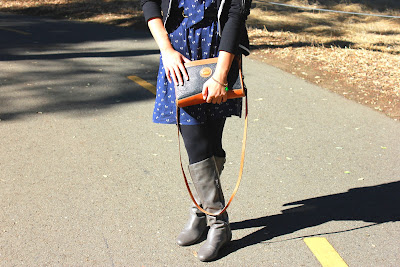
What I'm Wearing:
+ F21 bow dress....i love this dress because it's so light weight and versatile for all seasons
+ Black nautical-esque jacket.....This was from Macy's a few years back and I just think it's an easy jacket to throw on because the cotton blend makes it so comfy
+ F21 leggings
+ Gray boots.....I don't even know the brand of these because they're quite ancient but I do remember picking them up at Target for a steal. 
+ Gray  cowl scarf
+ Blue belt with gold buckle.....thrifted
+ Bracelet with green heart gem....DIY this from left over chains and charms
+ Dooney and Bourke shoulder bag...thrifted
+ Tory Burch rounded aviators.....These sunglasses were a gift from the bf and I love them. The lens has this cool design on it when you see it up close. I'll have to show you some other time. I just think the aviator style glasses are so retro and iconic that it might never go out of style.


The weather here in Northern California has been a bit....tumultuous lately, to put it lightly. One day it would be really hot then the following day will be filled with rain shower. As an example of this outfit post, it was chilly and wet in the morning then became sunny midday. I mean, I love the cooler weather we've been having but just wish we had a better heads up for the change. 


In other news, the bf has an interview with CSU Long Beach for the Nursing program so we're driving there for that on tomorrow. I'm just going for moral support, if it helps any. But I am looking forward to a change of scenery, even though it's a short one. Hey, better than nothing.


Hope all you guys had a great weekend!


Pin It Now!